Grilled Pizzas (Without a Grill)

pizza

I have pizza cravings more frequently than is normal, and I don’t have a good stand-by pizza place that I can call to satisfy my urges. The delivery pizza around here just doesn’t cut it. There are a few eat-in restaurants that I really like and, believe it or not, a mobile wood-oven pizza truck that pops up at local farmers markets that I’m obsessed with. I also really like making pizza at home, and at my cooking class, I learned how to make pizza on the grill! Unfortunately, I don’t have a grill, so I adapted the method for tortured, apartment-bound souls like me and grilled the pizza crust in a cast iron skillet. It did a pretty decent job of adding that toasty flavor!

pizza

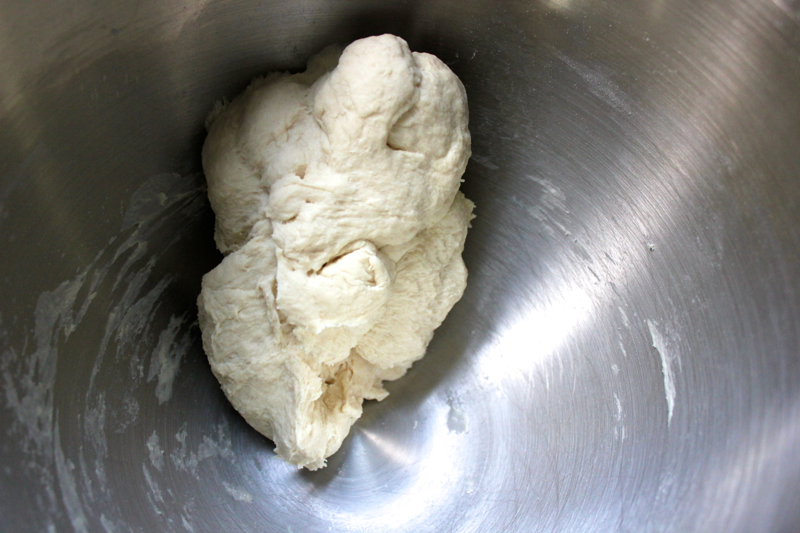
To make the pizza dough, sprinkle 1 packet of active dry yeast over 3/4 cup of warm water in the bowl of a stand mixer. You can also make this pizza dough in a food processor, but be careful removing the dough from the blades! Once the yeast particles have sort of dissolved and lost their individual shapes (if the yeast doesn’t react like this, toss it and start with a new packet), add 1 tablespoon of olive oil, 1/2 cup of flour, and 1 teaspoon of salt to the bowl. Turn the mixer on (using the paddle attachment), and continue adding 1/2 cup of flour at a time until the dough forms a ball and pulls away from the sides of the bowl (it will usually take about 2 cups total). You might have to increase the mixer’s speed to get the dough to completely pull away.

pizza

Turn the dough out onto a floured surface, and knead it very well for as long as you can. The kneading process will create gluten strands that will give your dough a great texture. Knead until your arms can’t take it anymore- about 10 minutes! Don’t worry, you’ll make up all of those burned calories with the delicious pizza you’re about to eat 🙂 The dough should be nice and elastic.

pizza

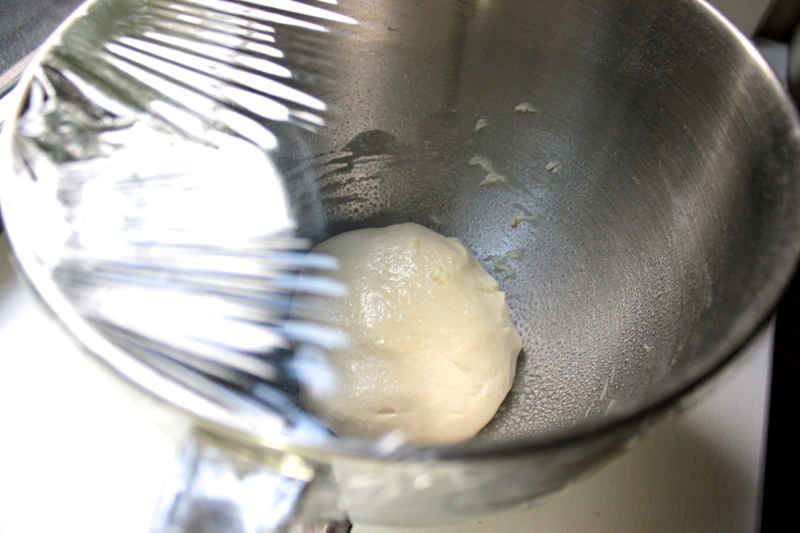
Transfer the dough to a greased bowl, cover it with plastic wrap, and set the bowl in a warm place for the dough to rise. My oven has a convenient bread proofing option, which sets the temperature to 100º F. If your oven can go on that low, use it! It’s the perfect temperature to get the dough to rise efficiently.

pizza

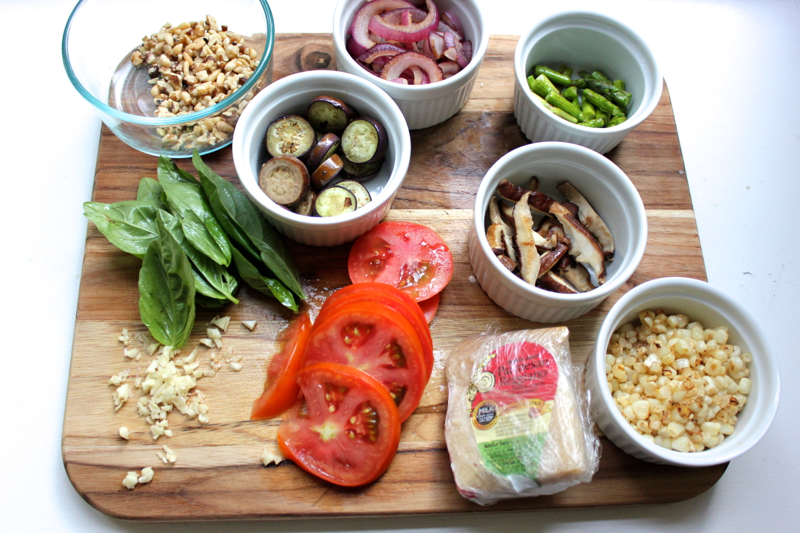
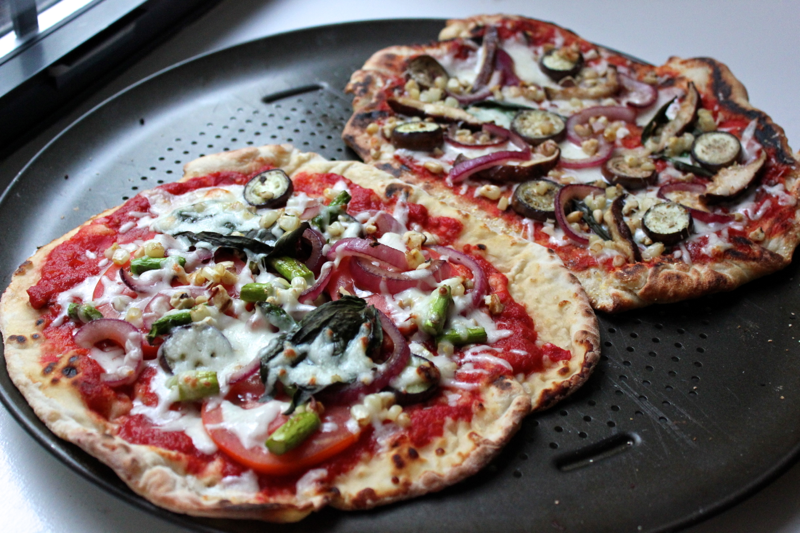
If you’re going to make your pizza on the grill, then you need to pre-cook your pizza toppings. You can prepare them while the dough is rising. I sautéed corn, eggplant, onion, asparagus, and shiitake mushrooms. I also toasted some walnuts and pine nuts and minced some garlic.

pizza

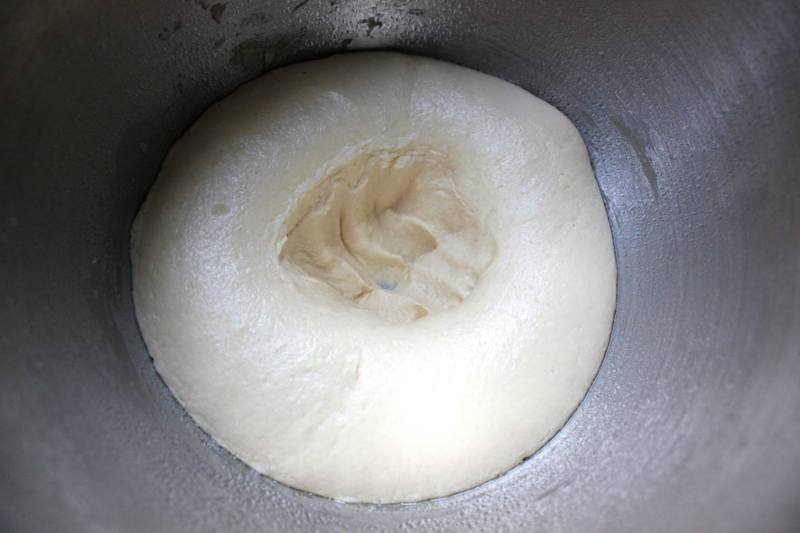
After the dough has doubled in size, about 40 minutes to 1 hour, punch it down.

pizza

Knead the dough a few times, then transfer it to a floured surface, and use a rolling pin to roll out a thin crust (yum!). If you’re going to be cooking your pizza dough on a real grill, then spread some cornmeal on a cutting board or on the back of a baking sheet, and put the dough on top. If you’ll be grilling it in a skillet, just flour both sides of the dough very well.

pizza

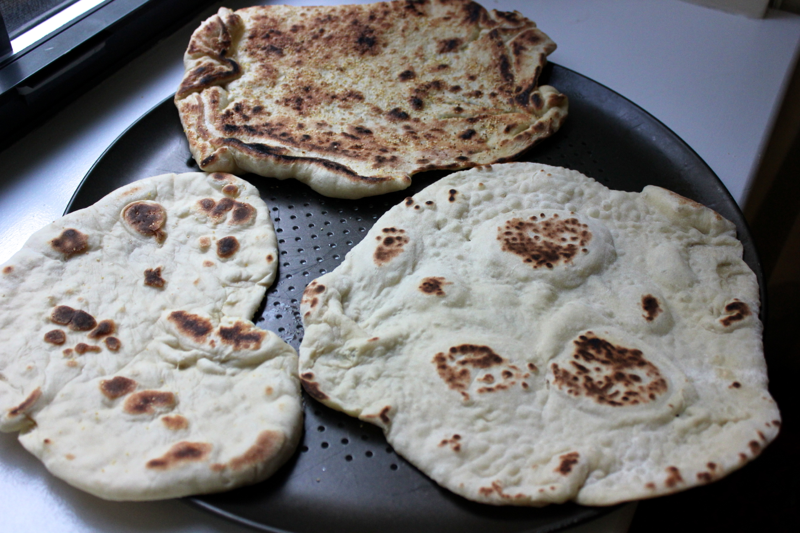
If you’re using a grill, make a motion like you’re pulling a table cloth out from under a bunch of glasses, and slip the pizza crust onto the grill. After about one minute, the bottom should be fully cooked, so flip it over. With the crust on the grill, add your toppings, and cover the grill to let the cheese melt. If you’re using a skillet, make sure it’s very hot, and then place the dough in. After about a minute, flip the crust over, and let it cook on the other side. Transfer the crust to a baking sheet, and continue browning your other pieces of dough. My skillet was only so big, so I had to make 3 crusts.

pizza

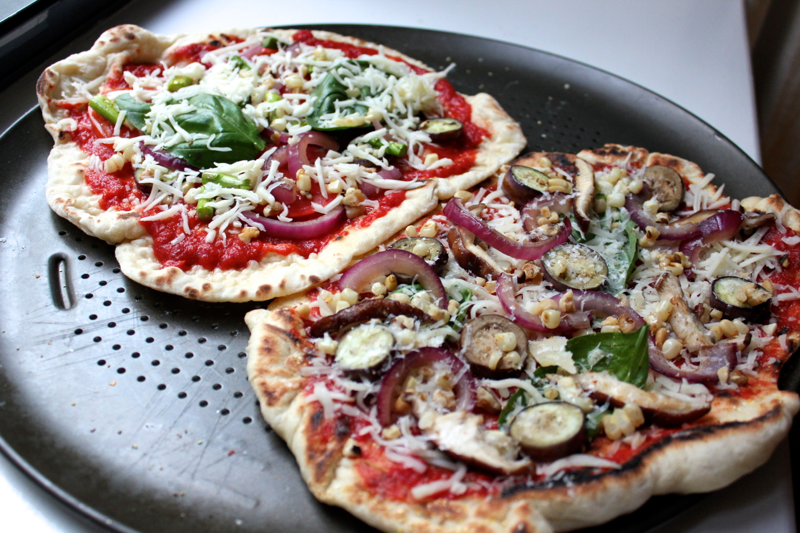
Put your favorite toppings on the crust.

pizza

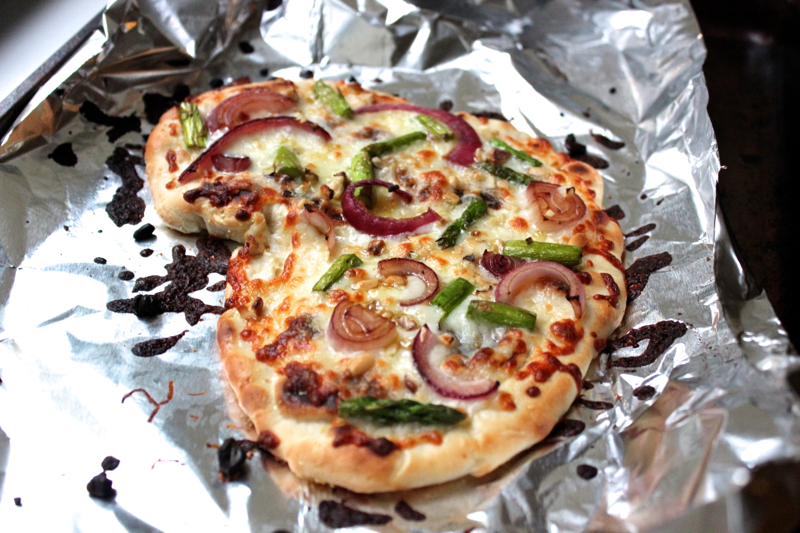
Then, bake the pizzas in a 500º F oven for about 6 minutes until the cheese is melted and browned. If you want to cook your pizza normally without grilling the crust first, just roll out the dough like you normally would, layer on your toppings, and bake it in a 500º F oven for about 10 minutes.

pizza

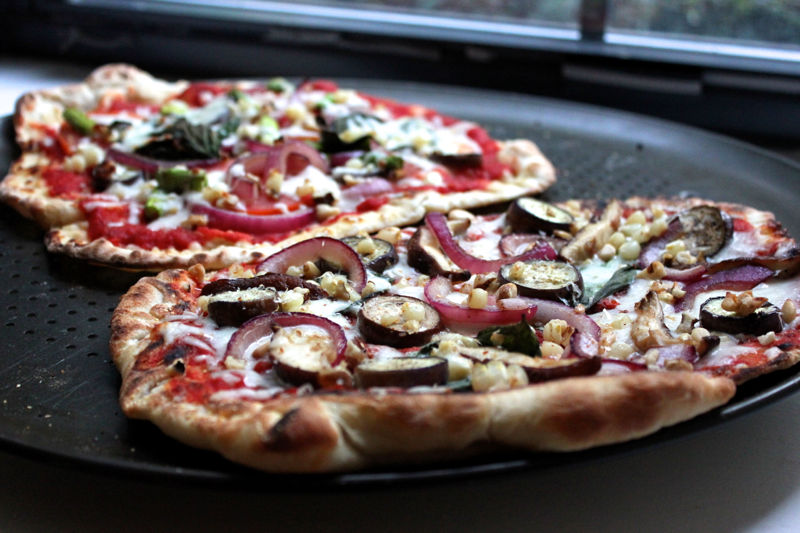
Then, slice your pizzas and enjoy crunching into them! I love the toasty thinness of the crust and the delicious toppings. And now I’m getting another craving…

Shopping list:

  • Active dry yeast- 1 packet
  • Olive oil- 1 tablespoon
  • Flour- 2+ cups
  • Salt- 1 teaspoon
  • Pizza toppings- whatever you like!
Print Friendly, PDF & Email

Thaislands

Thailand

Here is the last, and best, installment of our trip to Thailand. If I return to Thailand, I will beeline for the islands. We stayed in the Phang Nga Bay, a 45 minute boat ride from both Phuket and Krabi. It was the most beautiful place I’ve ever seen, with its clear, turquoise water and limestone pillars jutting out of the calm sea. The island had the best qualities we experienced sprinkled around Thailand, all captured in one place- kind people, delicious food, gorgeous views, a temperate climate, nature, and pure relaxation.

Thailand

We had some rainy, overcast days in the islands, but the limestone cliffs looked majestic in every kind of light- sunrise, dense fog, bright sun, and twilight. There were passing showers even on the clearest days, and we could watch rain clouds empty themselves as they passed in front of the limestone formations, making them disappear.

Thailand

We hired a long-tail boat to take us on a local island tour, and we got to experience the limestone pillars up close. They are even more beautiful at a short distance, and this one housed a secret inner lagoon. The water was shallow, and we could wade around inside the private oasis. I always assumed that people rowed long-tail boats with long paddles, but the boats are actually powered by disembodied car engines. Very innovative!

Thailand

What we didn’t expect from a distance is that people have taken up residence on many of the limestone islands. Some people were living on their beaches, selling beer and bathroom access to visitors, and drying freshly-caught fish. Other people found natural caves in the limestone that they turned into ramshackle homes. They rigged up bamboo platforms, filled jugs with fresh water, and lived a very picturesque, but probably boring, life.

Thailand

And, finally, we took a cooking class! The class started with a tour around the food-centric parts of the hotel. We saw the hotel kitchen, where we learned that women make all of the curries and men make all of the stir-fries because only men are strong enough to maneuver the woks. Hrmph…

Thailand

We saw the hotel’s extensive gardens and got to examine all of the different herbs, fruits, and vegetables growing there. They even had a hut where they cultivated different varieties of mushrooms! It was really educational to see how the different ingredients looked growing naturally, and hopefully, the knowledge will help me track those ingredients down now that we are home.

Thailand

We also saw a bunch of tiny bananas growing, and we had a big bundle of them waiting in our room when we arrived. They were sweet and tasty!

Thailand

Back at the class, we learned how to make coconut milk! Scrape the inside of a brown coconut out using sharp razor teeth, mix the shredded coconut meat with water, strain out the meat, and ta-da! Presto coconut milk.

Thailand

Here is the complete history of my life and tom yum soup: I first ordered tom yum soup in a now-closed DC restaurant, and I was convinced that I was presented with a bowl of vomit. After a few years, I decided to give tom yum soup another try to figure out whether or not I really was served vomit the first time. My second serving, from another restaurant, wasn’t quite as bad, but it still had a distinctive, vomit-like quality. Fast forward to our first night in Bangkok, and I decided to order tom yum soup- don’t ask me why. But it was amazing! No vomit could be detected! And then, we made tom yum soup as the first course in our cooking class, and it was also amazing! I can’t wait to track down the ingredients and make it here, and then I’ll share the recipe with you, and we can all eat tom yum soup in the safety of our own homes.

Thailand

I also learned that tom kha soup is essentially tom yum but with coconut milk in place of the chicken stock. We had a tom kha cocktail that was quite tasty and refreshing. Just a little spice for a warm evening 🙂

Thailand

Next, we made a rice noodle salad with pork and vegetables. It was delicious- the instructor was appalled by the amount of chili I put in my salad, but I liked it. I also really enjoyed getting to watch David cook. Even though we were making the same things at the same time, each of our versions tasted a little bit different, but both were delicious!

Thailand

For the main course, we made massaman curry, a mild but flavorful curry that had chicken, sweet potato, tomato, onion, and chestnuts in it. The chestnuts were very different from the chestnuts that I am familiar with. They were imported from Hong Kong, and they had a ridged outside and a very dark color. I seriously thought they were some kind of snail before I realized they were chestnuts. The flavor was also much sweeter.

Thailand

I’ll end with a few shots of our hotel room, which managed to be both incredibly luxurious but rustic at the same time. We slept with a mosquito net for the first time, and I really liked it. It was romantic, but I had to be careful when I got out of bed in the middle of the night not to walk right through it.

Thailand

We also had a monitor lizard greet us at the door one day. I jumped back 3 feet when I first noticed it, but then we had to snap away taking pictures for David’s brother, who used to have one as a pet.


But our absolute favorite part about the hotel room was the fish outside our front door. Sleeping fish meant do not disturb, and awake fish meant, well…awake. I loved putting the fish to sleep and waking it up, and I really need to find a way to craft one of these critters. It’s just so cute! And with that, my posts about Thailand come to and end…until I gather up the necessary ingredients and share the recipes I learned there with you!

Print Friendly, PDF & Email

Homemade Chicken and Swiss Chard Ravioli

ravioli

I am really in love with homemade pasta, but making ravioli is a true labor of love. We have done so much traveling this summer, that I haven’t had the opportunity or the will to spend time in the kitchen. Our first weekend at home, I got the cooking itch and spent five glorious hours preparing these tasty pasta pockets. It is much easier to make ravioli when you’re using leftovers in your filling or a filling that doesn’t require much preparation, like pumpkin. So if you’re making a meal with chicken and swiss chard, set some aside to stuff in ravioli!

ravioli

To make enough ravioli filling to serve four people, bring a pot of water to a boil, and drop in 1 chicken breast and 1 tablespoon of smoked paprika. Let the chicken simmer for about 10 minutes until it is opaque, firm, and fully cooked. Set the chicken aside to cool, and then dice it.

ravioli

While the chicken cooks, cut up a large bunch of swiss chard leaves, their stems, and two cloves of garlic. Sauté the garlic and the stems in olive oil until they soften, and then add the swiss chard leaves to the pan. Cover your pan to help the leaves wilt. Once the chard is cooked, season it with salt and pepper, and let it cool.

ravioli

Drop 1/2 shallot into a running food processor to mince it. Then, add in the diced chicken breast, 1 cup of the swiss chard, and 1/2 cup of ricotta cheese. Run the food processor until the ingredients are finely chopped and evenly combined.

ravioli

Transfer the filling mixture to a bowl, and season it very well with salt, pepper, and 2 teaspoons of lemon zest. You should over-season ravioli filling so that it packs a punch through the pasta.

pasta


Refrigerate the filling while you prepare the pasta dough. Add 1 cup of flour to a bowl, make a well in the center of the flour, and crack in 2 eggs. Drizzle in 1 tablespoon of olive oil, and throw in a pinch of salt. Using a fork, scramble the eggs in the center of the bowl. When the eggs are scrambled, begin incorporating the flour. The flour should form a craggy ball of dough. Turn the dough out onto a floured surface, and knead the dough very well until it becomes elastic.

pasta

If you’re using a KitchenAid pasta roller, set it to number 1. Otherwise, use your pasta roller’s widest setting. Run the pasta through the roller. Flour the pasta lightly if it is too tacky. Then, fold it into thirds, and slap down on it to remove any air bubbles. Continue passing the pasta through the roller at setting 1, flouring if necessary, and folding it into thirds until it becomes elastic. Then, turn the roller to setting number 2, or the next thickest setting. Pass the pasta through once, with the wide side going in first so the sheets are wide enough for the ravioli mold. Do not fold the pasta. Continue decreasing the roller settings, passing the pasta through once, until you reach setting number 8, or the thinnest setting. If the pasta gets too long to manage during this process, you can use a sharp knife to cut it into sections. Just remember which setting the pasta was on when you cut it so you can continue rolling where you left off.

ravioli

Flour the ravioli mold, and lay one sheet of pasta over it.

ravioli

Place even spoonfuls of the chicken-swiss chard filling in the center of each ravioli, making sure to keep it away from the edges. Prepare an egg wash by whisking together 1 egg and a splash of water. Use a pastry brush to paint the egg wash around the sides of the filling so that the ravioli seal.

ravioli

Carefully lay a second sheet of pasta over the mold, taking care to press the air out of each ravioli. Run a rolling pin around the sides of the ravioli mold to cut away the extra pasta, and then, in a quick motion, flip the mold over and sharply rap it down to force the ravioli out.

ravioli

Cut the ravioli apart, and place them on a parchment-lined baking sheet while you continue forming the rest of the ravioli.

ravioli

Once the ravioli are formed, prepare your pasta sauce. The sauce should be ready and waiting to receive the ravioli once it is cooked.  Halve two cups of grape tomatoes, and mince 2 cloves of garlic.

ravioli

Warm some olive oil in a pan over medium heat, and add in the tomatoes and garlic. Allow the tomatoes to caramelize and burst, and then season the sauce with salt, pepper, fresh basil, and more olive oil. Then, boil your ravioli in batches for approximately 3-4 minutes until the ravioli float and become transparent enough for you to see the filling. Drain the ravioli, toss them in the sauce, and transfer them to a bowl.

ravioli

Top the ravioli with toasted walnuts or pine nuts for a crunchy texture. Sprinkle some smoked paprika and parmesan cheese over the ravioli, and then dig into a very well-deserved meal! As you can tell, making this ravioli is a ton of work, but I think it’s worth it. And I was even able to freeze some extra, uncooked ravioli to effortlessly enjoy on another day 🙂

Shopping list:

  • Chicken breast- 1
  • Swiss chard- 1 cup, wilted
  • Garlic- 4 cloves
  • Lemon- 1
  • Smoked paprika- 1 tablespoon+
  • Shallot- 1/2
  • Ricotta cheese- 1/2 cup
  • Flour- 2 cups+
  • Eggs- 3
  • Olive oil
  • Salt and pepper
  • Grape tomatoes- 2 cups
  • Basil
  • Walnuts or pine nuts- 1/4 cup
  • Parmesan cheese
Print Friendly, PDF & Email